Creating Mid-Autumn Festival Lantern for Mây Sơn
Growing up in Việt Nam, when the night sky was still truly dark and unpolluted by electricity, lanterns carried a mysterious power over childhood.
How could they not? Imagine sitting under a sky filled with a million stars, listening to the songs of nature: leaves rustling, crickets chirping, earth turning, and even silence in fleeting moments. When a lantern glowed and swayed with the autumn wind, it felt like holding a personal star.
With its traditions of sweets and lights, Tết Trung Thu, or Mid-Autumn Festival, was often called the Children’s New Year. Even as an adult, it remains a reminder of how simple life once was.
This was my daughter Mây Sơn’s first Tết Trung Thu. At only four months old, she couldn’t understand the meaning of the festival, but she already loved colors and lights. So I set out to create a lantern for her first little celebration.
Design
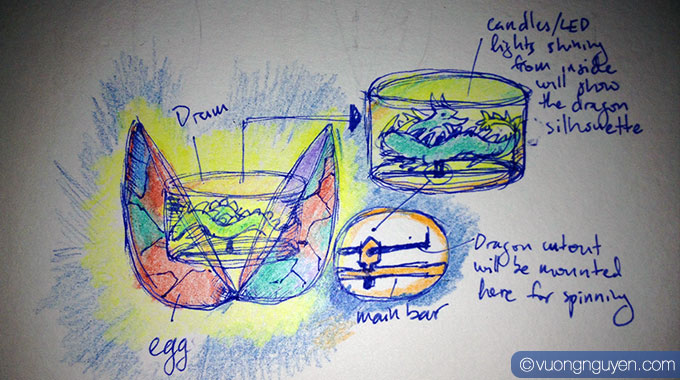
Mây Sơn was born in the year of the dragon, nicknamed “Rồng Con” or “Baby Dragon” by our family. I wanted her lantern to reflect that. After some thought, I chose a design that symbolized an egg cracking open to give birth to a baby dragon.
Materials
Raw bamboo, multicolor Cellophane sheets, thick paper for the dragon cutout, metal wires, glue, clear tape, needle, and thread.
It Turned Out Well!
This was the first time I had made a Trung Thu lantern from scratch in the U.S. After gathering the materials, it became a process of trial, error, and problem solving.
It felt wonderful to handle bamboo again, just like when I was a kid. But the greatest joy came from creating something new for my daughter.
After dinner, we turned off all the lights in the house.
Carried by grandma, with mommy singing a familiar Tết Trung Thu tune, and led by daddy holding the lantern, Mây Sơn had her first “rước đèn” — the lantern procession to welcome the moon. She smiled sweetly at the light, more curious about the commotion than the tradition itself.
Later that night, holding her hand as she drifted to sleep, I realized how much she had grown in just four months. Bigger in body, stronger in spirit, she was learning in a new world and giving us, her family, countless lessons in return. Love remains a lesson without end.
Happy first Tết Trung Thu, little Mây Sơn. Don’t grow up too fast, con gái. We are still catching our breath.
Lantern Creation Process
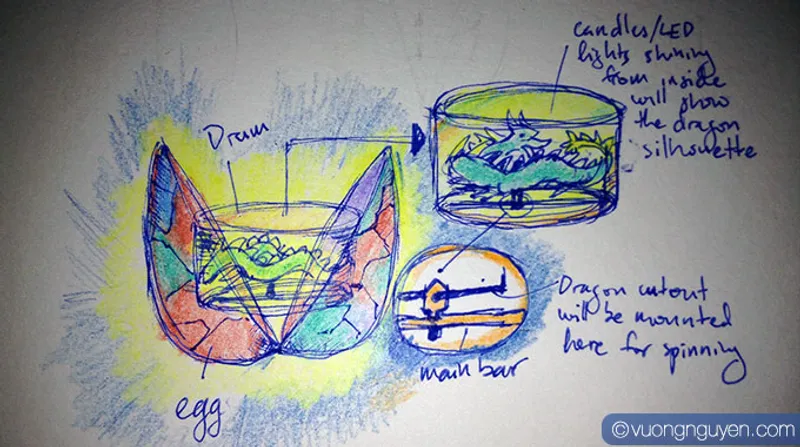
A simple sketch of the lantern with details of certain parts. I was excited to see how this would turn out.

I wanted to be authentic to my childhood and use raw bamboo, but getting it shipped to the U.S. was expensive. After a few calls to a bamboo farm in Mississippi, I decided to go with dried decorative bamboo from a local art store.

These dried bamboo sticks had many knots, which made splitting them difficult. I used a combination of my mother's large kitchen knife, an axe, and a hammer to get the job done.

Even dried, the bamboo was surprisingly flexible and strong. To be safe, I still ran the pieces under hot water.

Growing up in Việt Nam, I often used rubber bands to bind bamboo. They were quick and strong but did not last long. Here, I used metal wire as a sturdier replacement.

A close-up of the wire bindings.

The drum frame and the two main egg rings completed.

Egg frames completed.

I discovered a small crack in one of the drum frame rings. Rather than undo all the bindings, I added a supporting bamboo piece and secured it with wire.

Working with dried bamboo required a saw to cut the main bar for the drum. This bar would serve as the base for the spinning dragon.

The center bar attached to the drum with a hole in the middle. This is where I planned to place the spinner.

I began working on the spinner's base. Sanding the bamboo, I hoped it would be smooth enough for spinning.

Drilling bamboo is stressful because it cracks easily. I started with a small drill bit and gradually widened the hole, planning to insert a thinner bamboo stick to hold the dragon.

Cracked. The sanded piece split when I tried to tighten the joint. I had to change the design and suspend the dragon from the top instead.

At the end of the first night, the drum and egg frames were complete. Here I tested how the Cellophane sheets would look on the drum. Not bad.

Using a glue stick, I attached the Cellophane sheets to the drum. The glue left waxy residue on the bamboo and plastic.

My wife suggested using needle and thread to bind the Cellophane to the bamboo. Sewing was fun but much more time-consuming.

Cellophane attached to the bamboo frames. I used clear tape where sewing was too difficult. The egg shells glowed with vibrant colors.

The two egg shells and the drum bound together with wire.

Working on the paper cutout of the dragon to create the drum silhouette.

Opening up the dragon's eyes.

Rushing to the finish line before nightfall.

All done, with LED candles added to the bottom of the egg shells.

Close-up of the dragon chasing a heart.

Dragon silhouette.

Another dragon silhouette.

Close-up of the drum.

Dragon-in-drum close-up. Notice the bow at the dragon's tail? Yes, it is a girl dragon.

Dragon silhouette seen through the egg shells.